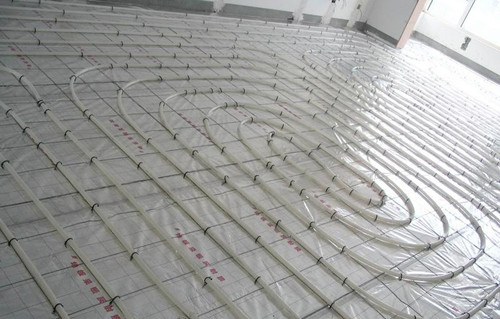
Floor heating is the abbreviation for floor radiant heating. This home heating method uses the entire ground as a large radiator to achieve the purpose of uniformly heating the floor through the hot medium in the floor radiant floor, and conducts the heat to the ground to reach indoor personnel. The purpose of heating. Next, Xiao Bian will introduce the precautions for warm laying and installation of floor heating and installation procedures. Warm laying installation precautions 1. Do not bury the joint underground Many irresponsible installation teams, in order to save material, connected the remaining loop pipes, which saves material, but the risks are left to the customers. Once the leakage is repaired, it is troublesome. The wooden floor is better. If it is a floor tile, it will inevitably require a hammer to open. The leak may also cause incalculable property damage. 2, the material plan must be precise Accurate calculation of materials is very important. Failure to do so will cause great waste, and it may even result in loop imbalances and affect circulation. 3, cracking after backfilling After the backfill, try to close the windows to prevent the cement from drying too fast and cause cracks. In the winter, you should also freeze the water. In summer, if you have a high temperature, you must water it every day to prevent cracks. In addition, do not use too low-grade cement or it will cause cracking. . 4, centralized heating to be installed back to the pump If you are using a centralized heating, install a back pump as much as possible. The back pump plays a role in adjusting the water temperature. When the water temperature is high, he will reduce the flow or shut down to overcome the decrease of the service life of the warm tube due to the high water temperature. When the water temperature is too low, it will automatically increase the flow to achieve your pre-designed use temperature. 5, pipe laying is not as dense as possible The specification specifies that the floor-to-floor warm-up distance is 22.5cm. In practice, many customers want to make the laying density larger, and some adjustments are appropriate. If the density is too high, the tube turns too quickly will cause the flow of resistance to increase and the flow will decrease. The use of the effect, the other is the distance between the construction process leading to bending the pipe will increase the chance, will also lead to a drop in flow, affecting heating. Floor heating installation process The first step, install the water collector According to the position and elevation determined in advance according to the actual situation in the user's home, the assembled water collector is flatly and firmly attached to the wall, and is fixed with expansion bolts. In order to prevent the loss of heat, it is necessary to put a special insulation cover for the pipe connecting the manifold to the installation room. Connect the jacket with the insulation jacket to the manifold, and connect the end of the pipeline to its thermostatic valve. After the pipe is laid, the pipe's cover is transferred back to the manifold and fixed. The second step, leveling the ground Before the floor heating is officially started, the floor of the room must be cleaned first to ensure the formation of the ground and eliminate irregularities and debris on the floor. Then, it is necessary to conduct an on-site inspection of the entire home to determine the installation position of the boiler and the manifold. The third step, installing the main water pipe To warm the main water pipe must use hot water pipe, can use PP-R or aluminum plastic pipe, strict installation of design drawing pipe, installation straight and tidy. The fourth step, install the temperature control line Slot the place where the distributor is installed, bury the temperature control line, and place the relevant temperature control line around it for connection. Step 5, laying insulation Insulation board laying should be smooth, neatly cut, tightly connected to each other, the whole board should be placed around, and the cutting board should be placed in the middle. When laying, pay attention to the flatness of the insulation board, and the height difference must not exceed plus or minus 5MM. The gap is not greater than 5MM. The sixth step, laying reflective film The reflective film must be laid flat and there must be no folds. Cover tightly, no leakage of insulation board or ground phenomenon. The reflective film is symmetrical and neat, and there must be no wrong phenomenon. The reflective film must be affixed with transparent tape or aluminum foil tape. High-quality reflective film and standard laying can reflect 99% of the heat. Step seven, laying floor heating pipe The floor heating pipe shall be laid according to the pipe spacing and orientation calibrated on the design drawings, shall be kept straight, and the pipe shall be fixed on the extruded board or fixed on the wire mesh with plastic clips according to the drawings. When the installation is interrupted or completed, the opening should be closed at any time. To cut the floor heating pipe, special tools should be used; the cuts should be flat and the fracture surface should be perpendicular to the axis of the pipe. The eighth step, pipeline pressure test After the floor heating pipe is laid, it is necessary to conduct a hydrostatic test on it, and the pipe is first flushed with water, purged, etc. to ensure that there is no foreign matter in the pipe. Then from the water injection valve to inject clean water, the test pressure of 1.5 to 2 times the working pressure, but not less than 0.6Mpa, pressure drop within 1 hour is not greater than 0.05Mpa, and infiltration is not acceptable. Step nine, backfill and level the ground All the backfilled fine stone concrete shall be artificially pressed and compacted. The horizontal line of the entire house must be maintained at a height, and no wire mesh exposure shall occur. When laying concrete, markings must be made at entrances, aisles, floor drains, etc. to prevent improper heating in later construction from damaging the pipeline. Tenth step, install the boiler According to the size of the boiler, and the size of the installation before the installation, the position of the flue, after installing the wall-hung boiler in the correct position, the bottom interface of the boiler is connected with a hose. The eleventh step, system acceptance After the construction of floor heating is completed, the user must not forget to check and accept the entire floor heating system. The acceptance is divided into material acceptance, construction acceptance and commissioning acceptance. Finally, the owner personally confirms the signature. Editor's summary: The instructions on laying and installing the floor heating and the floor heating and installation process are introduced here. I hope to help everyone. If you want to know more about yourself, you can follow the information on this site. Floor heating and floor heating
Steel Pipe used for conveying fluid pipe, such as oil, natural gas, water, gas, steam, etc.
Steel pipe is one of our mainly produces ,made of carbon steel, stainless steel, alloy steel and other special metal materials as required by its customers.
Stainless Steel Pipe,Seamless Stainless Steel Pipe,316 Stainless Steel Pipe,Stainless Steel Tube Shijiazhuang Huize Pipe Fitting Co., Ltd. , https://www.huizegd.com
Steel pipe contains two types: seamless steel pipe and welded steel pipe

Warm laying and installation precautions Floor heating installation process